


Donate Now
and become
Forum Supporter.

Many perks!
<...more...>


|

04-30-2022, 03:10 AM
|
 |
Member
|
|
Join Date: Mar 2021
Location: NYC, NY
Posts: 55
|
|

I appreciate all the advice haha and yes I am trying to sleep better. Finished with finals for cardiology and pulmonary, so had a little free time to work on it at last. Current update:
Initial planting completed and replaced the acrylic doors. The plants were secured with U-shaped metal pins I made with stainless steel wire. So many things still left to do such as installing the automation, fans, painting the PVC pipe black etc., but at least it is somewhat functional in keeping a humid growing environment. As I keep adding things, the plants, moss, and charcoal will break up the artificiality of the foam background and should look pretty good when mature, but that will take quite a while to get too.


The mounted plants from left and going clockwise (minus the misc. Tillandsias):
- Potinara Burana Beauty 'Burana' (the cattleya)
- Broughtonia Jamaica Jester (negrilensis x ortgiesiana)
- Tolumnia varietgata
- Brassavola nodosa
- Ascocentrum ampullaceum
- Cattleya schilleriana
- Neofinitia falcata
- Tolumnia Kalapana Red
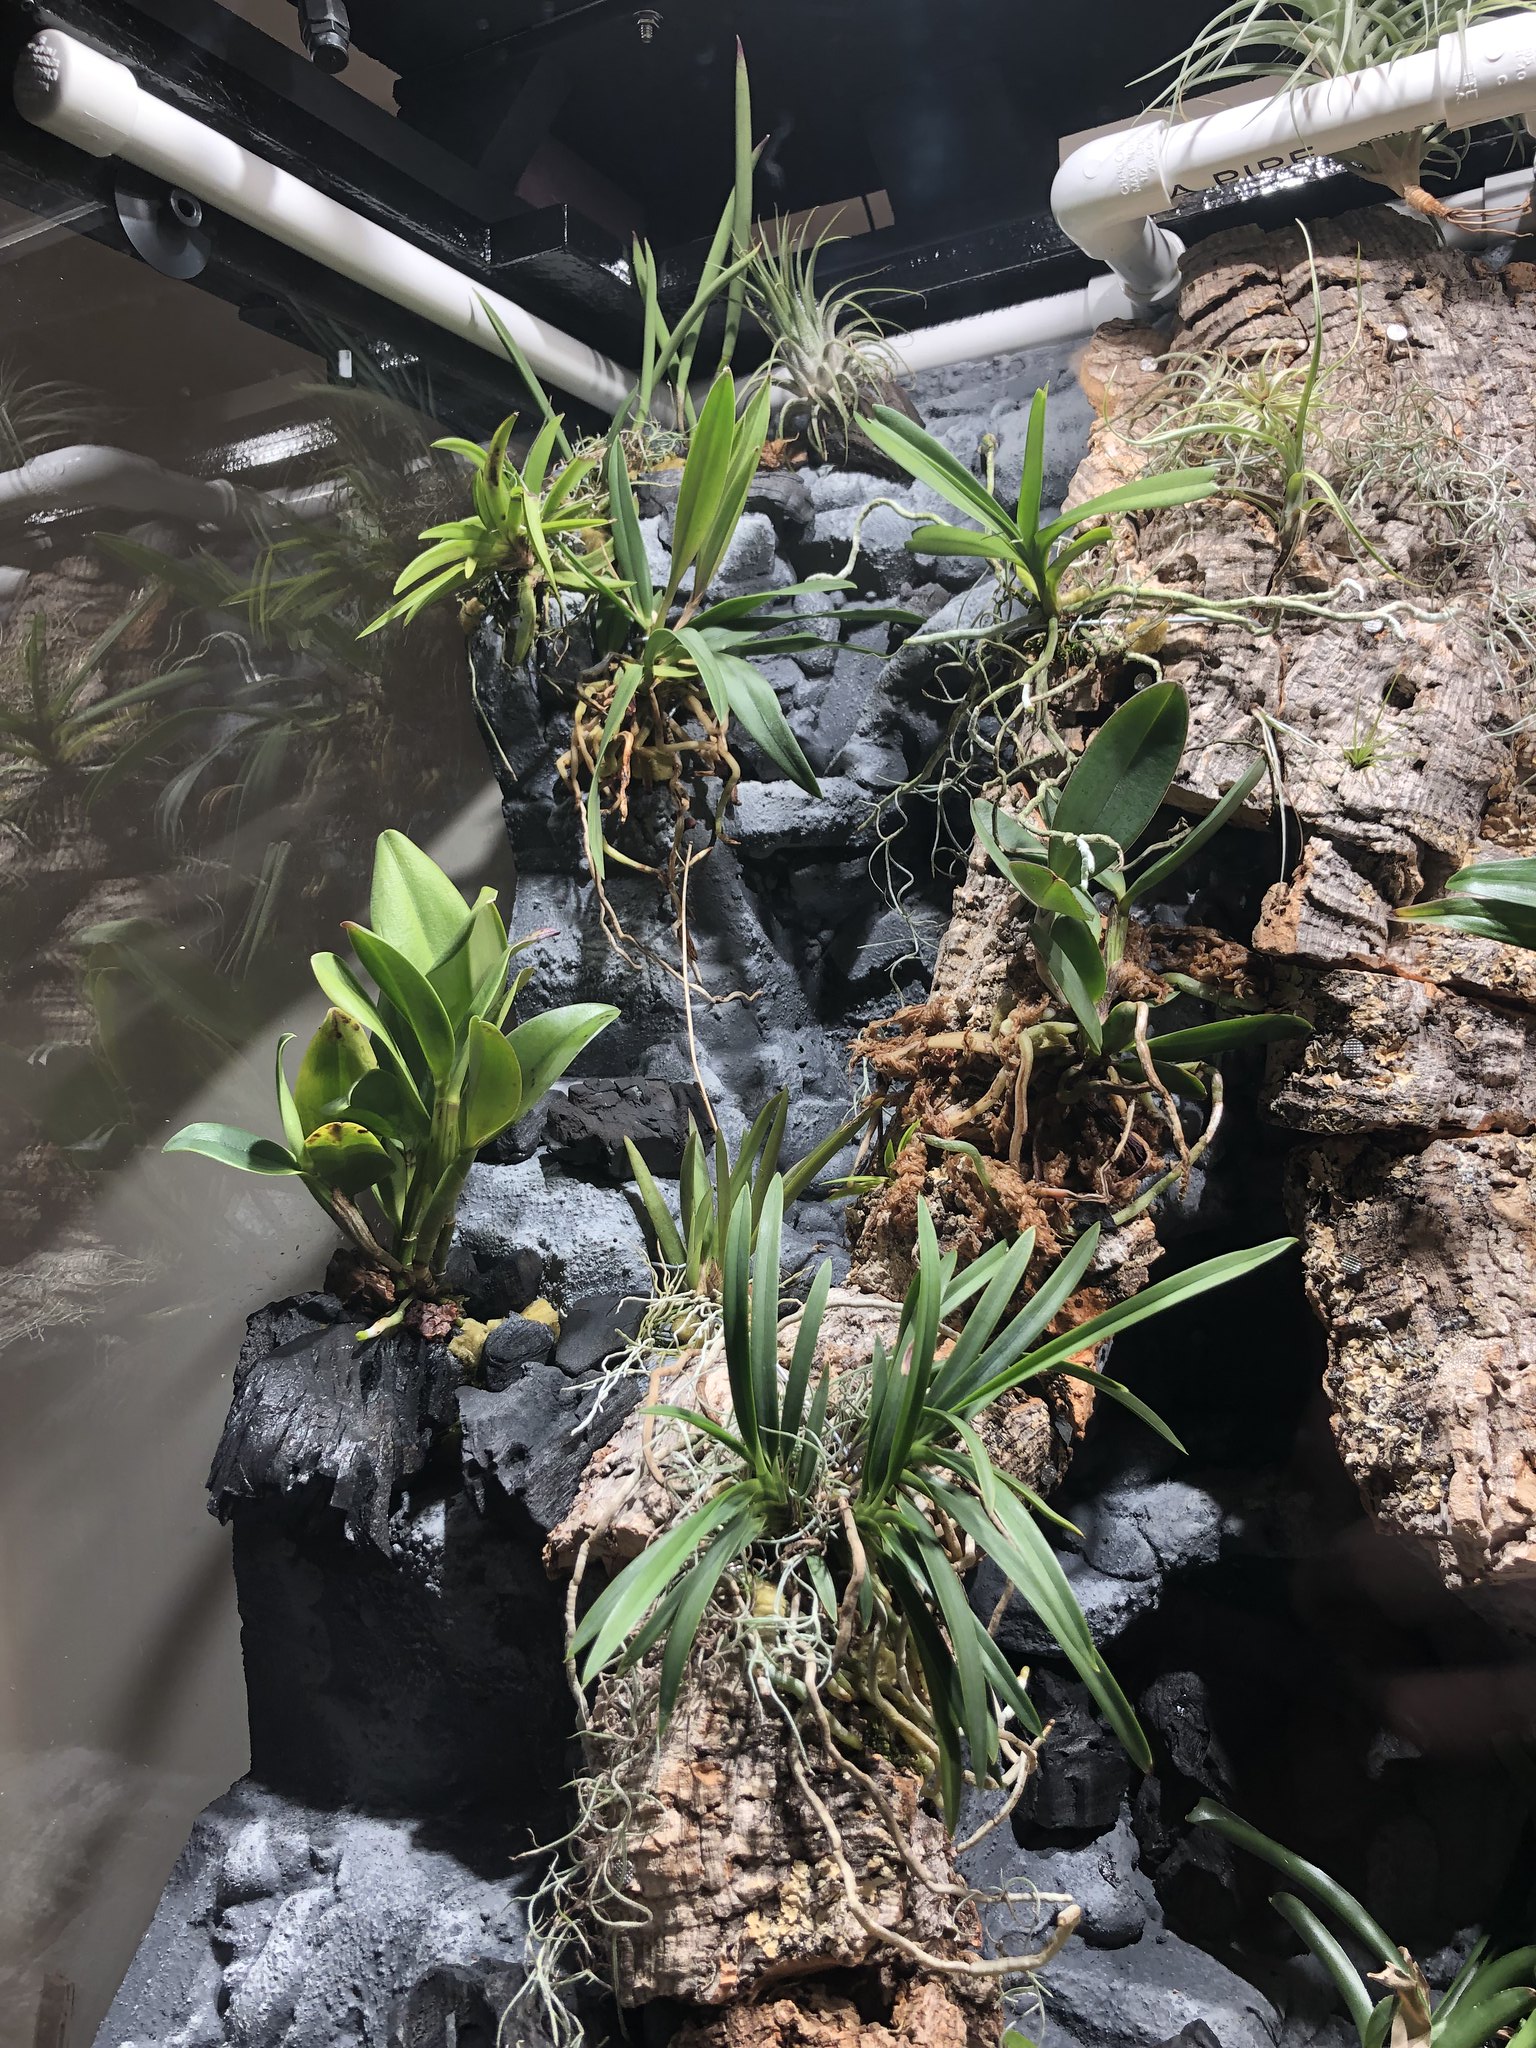
This area will not be watered with the dripwall system during 1 or 2 of the winter months, as these plants prefer a drier winter rest. There will still be misting, however. As a result, this area will look more "scrubby" with less moss compared to the rest, and so I might add some larger lichens to fill up the space. Planning also to eventually find some rupicolous laelias to put here as well, as it also has the highest light. The rest of the enclosure will be pretty consistent throughout the year though.
 |
 |
 |
 |
 Mistking
|

Looking for a misting system? Look no further. Automated misting systems from MistKing are used by multitude of plant enthusiasts and are perfect for Orchids. Systems feature run dry pumps, ZipDrip valve, adjustable black nozzles, per second control! Automatically mist one growing shelf or a greenhouse full of Orchids.
See MistKing testimonials |
|
 |
 |
 |
 |

|
|
Post Thanks / Like - 2 Likes
|
|
|
|
|

05-10-2022, 03:00 AM
|
 |
Member
|
|
Join Date: Mar 2021
Location: NYC, NY
Posts: 55
|
|

90% to minimum functionality! The remaining 10% will be connecting the menu control system I mentioned before and attaching the humidity sensor. Ran out of wires and USPS lost the set I bought so gonna have to wait a little longer before that will get done.
However, general planting is complete and I will try to give a brief explanation of my reasoning for the plant placement. First, here is the full front view:
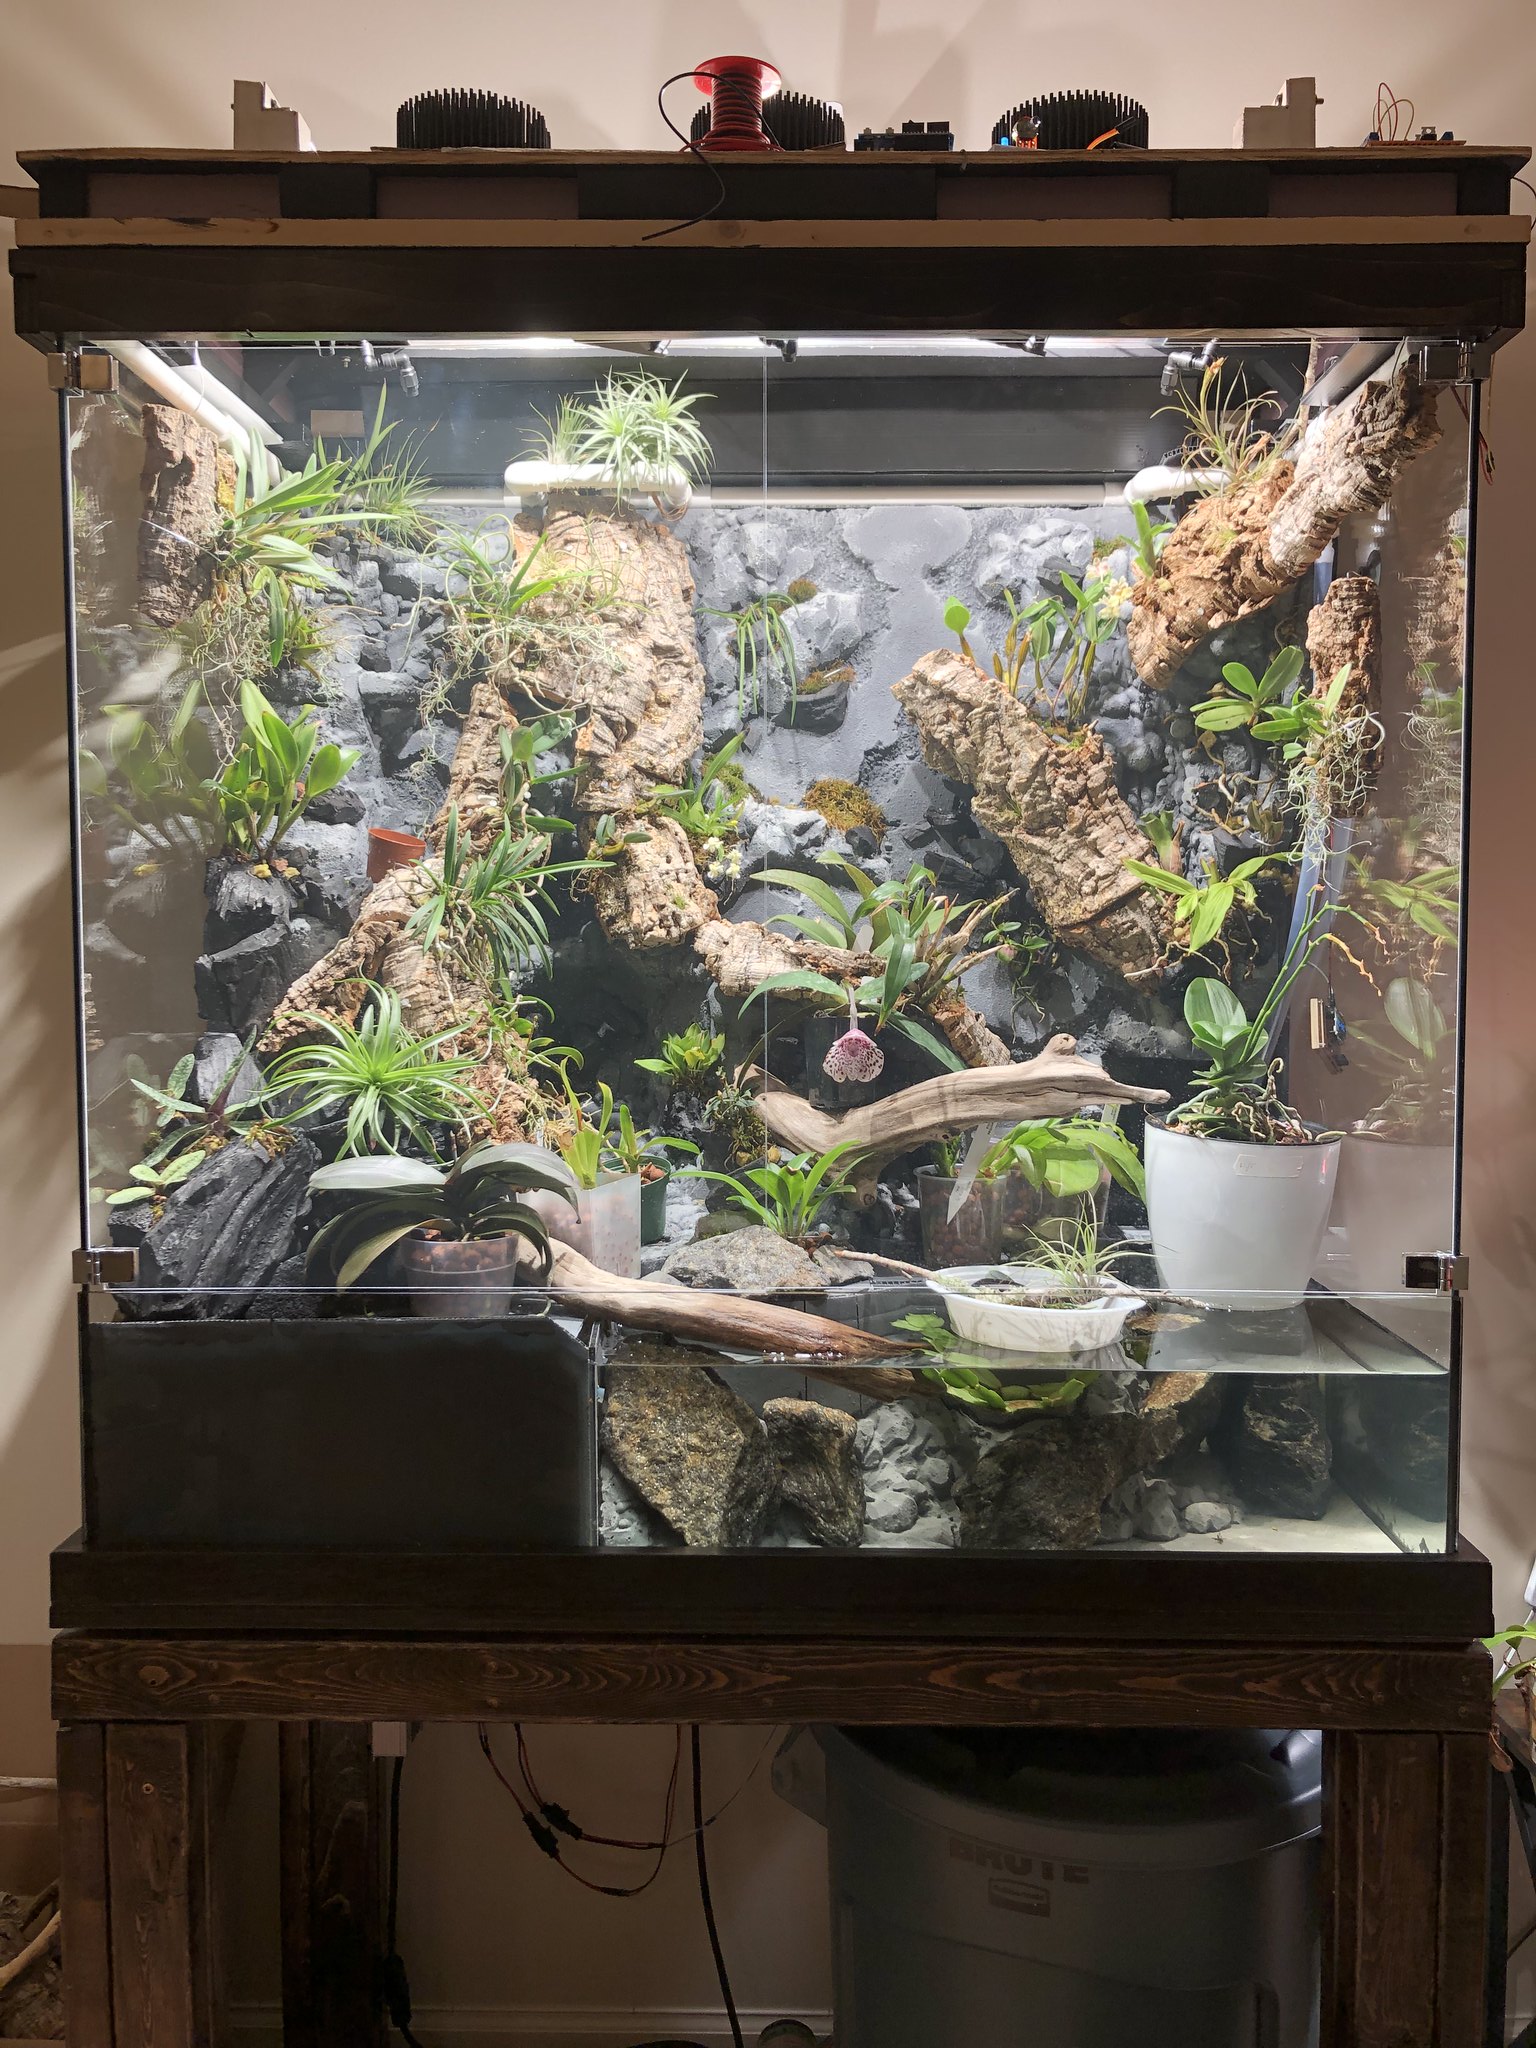
The goal of this project is to allow each plant to grow as naturally as possible. This means that many will be mounted and receive daily automated watering and relatively quick drying. Since this terrarium houses species from a wide range of environments, I split the orchidarium roughly into quarters with increasingly better drainage (and thus a drier area) as one goes from right to left and bottom to top.
In the top-left (dry, bright), we have orchids like Brassavola nodosa, a couple Tolumnias, and eventually some rupicolous laelias. There are also some cattleyas that appreciate the light too that I placed closer to the bottom of this quadrant to accommodate better their growth habit.
In the top-middle to top-right (wet, bright), we have Leptotes bicolor and eventually some Sophronitis that will appreciate the light and good drainage due to the vertical wall. The wetness will come from rockwool and moss attached to the wall. The Dendrobium Nano Chip also seems to enjoy brighter light, and being higher up allows better appreciation of its flowers since they tend to "nod". I reserved the area to the right of the Nano Chip to plants that tend to have more of a pendant growth habit, such as Aerangis modesta and Paphinia neudeckeri. It is a little bright for these plants which like shade more, but future plants that will be mounted on the cork bark above them will eventually provide some diffuse shading.
 [/url]
There is currently nothing in the bottom-right (in fact I haven't even finished the foam part for it...), but since it is the closest to the fogger I built into the wall, it will eventually house lower light plants that like higher humidity such as smaller Dracula species. Still deciding on what to eventually do though.
Towards the bottom half of the middle portion where the "leg" of the tree is (bright, wet), I reserved some deeper pockets for future phragmipediums. I also mounted the Dendrobium Hibiki onto the "leg" as the extra height will help appreciate the flowers that will grow on the canes. As for the rest of the bottom in the valley (shady, wet) I saved specifically for things like Masdevallias, D. cuthbersonii hybrids that better tolerate heat, and perhaps some jewels in the future.
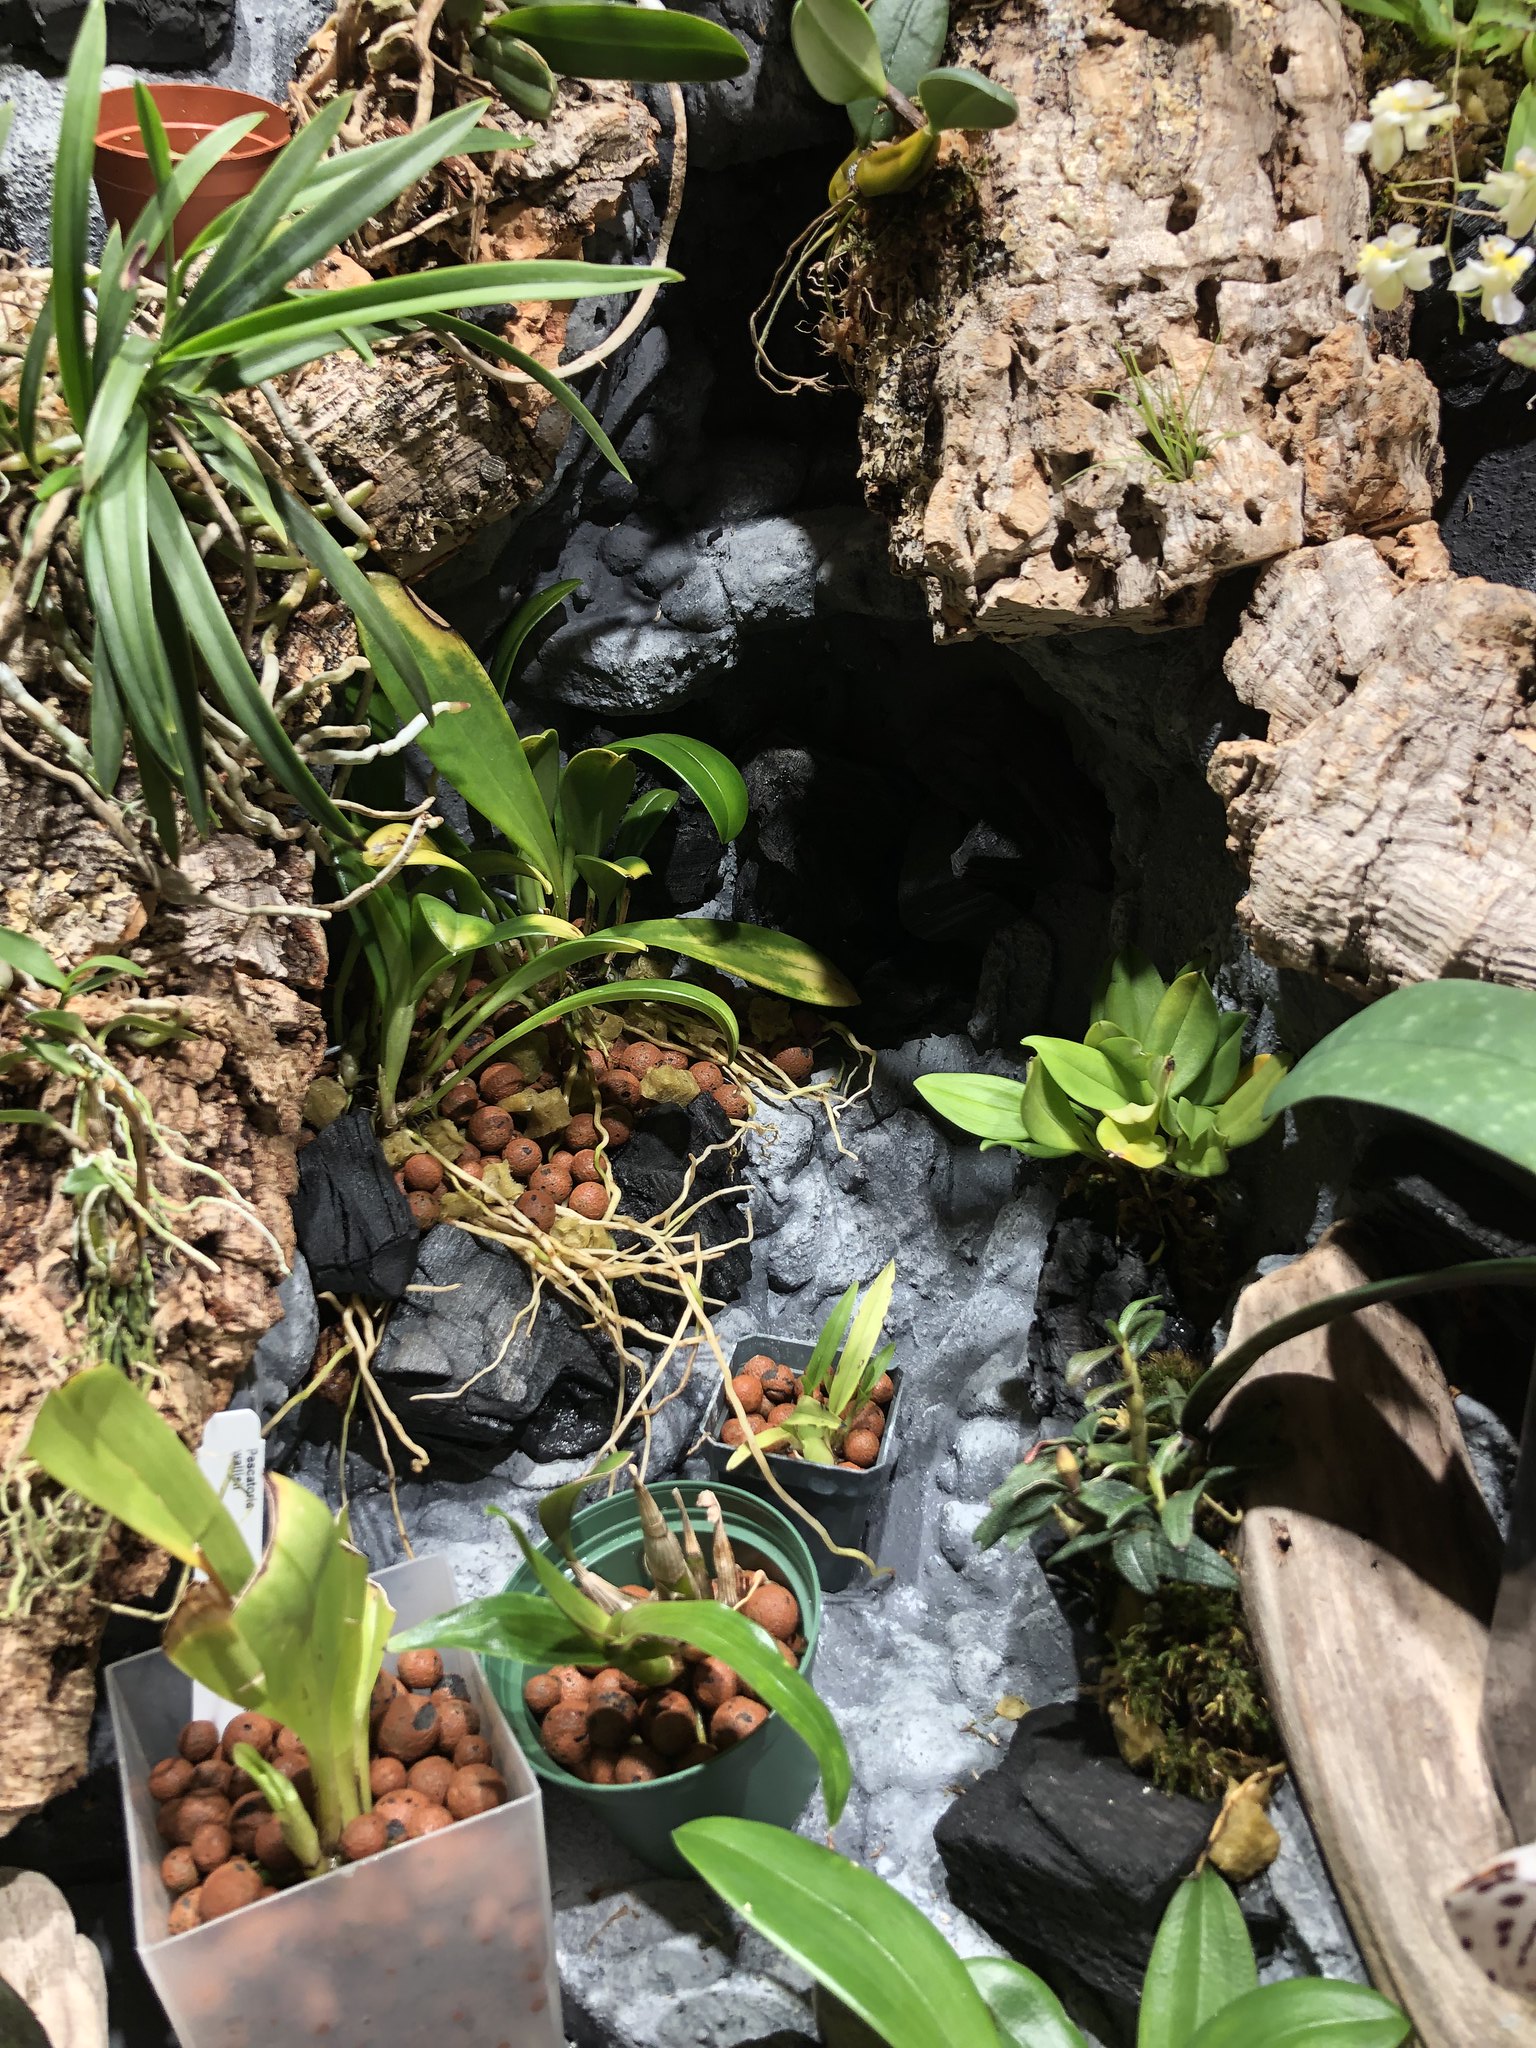
Finally, I reserved the bottom-left (shady, dry-ish) for paphs. After seeing in situ photos of paphs on slippertalk, I really wanted to try to somewhat replicate their tendency to grow in the nooks of limestone cliffs. To that end, I used the larger charcoal chunks to create a similar terrain, lined the bottom with rockwool, and filled it with LECA to essentially create a shallow semi-hydro pot. So far I have Paphiopedilum delenatii and bellatulum, and planning to add barbigerum in the future. As mentioned previously, I will remove the dripwall on the left side of the enclosure for a month or two in the winter to replicate the drier winter many of these plants naturally go through. The bottom lined with rockwool will still provide a small reserve of moisture for the paphs as the watering decreases, as leaf litter and humus deep in those rock crevices will do in the wild. There will still be daily mistings to replicate morning/evening dew though, so it won't be completely dry. Trying to also grow some temperate moss here as well, as they won't mind the drying.

Also just a quick pic at the fans I installed on the ceiling. I programmed these to run more often with increasing humidity. Note - I HIGHLY recommend the bequiet! Pure Wings fans (the black one in the picture). They are indeed very quiet, don't drone, and fairly cheap (92mm for $10). The Noctua Redux I got is not bad either, but it does drone a bit and is a bit more expensive than the bequiet!. Will be adding a third to the right side. There are also enough holes in the canopy such that I will just use a tiny 40mm fan I have for the exhaust.

Last edited by kcpi3141; 05-10-2022 at 03:04 AM..
|
|
Post Thanks / Like - 1 Likes
|
|
|
|
|

05-10-2022, 05:42 AM
|
 |
Administrator
|
|
Join Date: Oct 2007
Location: middle of the Netherlands
Posts: 13,777
|
|
I really don't know how I missed this thread and all your updates to the project. It was a real pleasure and treat to read, and it's been a long time since there's been since sort of building thread on OB.
Your tank looks amazing! It already looks really natural even though the back wall is still mostly bare. I'm also very impressed that it's nearly entirely DIY. I also like what you did with the Paphs, those charcoal crevices look nice.
I assume that this is going to be mostly maintenance free once you have everything up and running and you want it? And will there be anything in the water later? (of the plant and/or animal variety)
__________________
Camille
Completely orchid obsessed and loving every minute of it....
My Orchid Photos
|
|
Post Thanks / Like - 1 Likes
|
|
|
|
|

05-10-2022, 04:40 PM
|
 |
Member
|
|
Join Date: Mar 2021
Location: NYC, NY
Posts: 55
|
|

Hi Camille, thank you so much! Very happy that it was as much of a pleasure to read as it was for me to build haha.
Yes, it has the capacity to be completely maintenance-free such that if I go out of town for two or so months, things should still be alive by the time I get back. However, I like to take care of and micromanage my plants every day, so some of the automated functions I am thinking of turning off. Some things like water changes for the aquatic portion and changing filter media are still manually done.
Regarding the aquatic portion, I will be planting Anubias and Bucephalandra to match the epiphytic theme (they are aquatic epiphytic aroids) and because they are easy to grow. I might place a couple faster growing, undemanding stem plants to soak up any extra nutrients. The rocks in there currently are just to weigh down the foam, and since I will be moving to on-campus housing next semester, I will save the scaping until after the move. There will eventually be sand as well.
As for animals, I am planning on trying Vampire Crabs (Geosesarma sp.), as they will be able to enjoy the water and the abundant land portion. I asked about if they will bother plants on Dendroboard and the reply was it is very unlikely. Some other people's experiences are the same and that the most they might do is to casually chew on some moss. Might also throw in a couple shrimps for kicks and to help with algae.

|
|
Post Thanks / Like - 1 Likes
|
|
|
|
|

05-18-2022, 11:22 PM
|
 |
Member
|
|
Join Date: Mar 2021
Location: NYC, NY
Posts: 55
|
|

After two weeks of code debugging, fine-tuning, and continued work on the background:
https://youtu.be/M7r58HSlPcs
Everything is growing insanely fast (for orchids), such that even my cattleyas that just finished a new growth less than a month ago are already putting out new shoots and roots. The Neofinetia is already immovable from the cork, among other things. Finally, most of the mosses have finished adjusting to their new environment (it takes some time in my experience, especially with collected moss) and have begun proliferating as I hoped.
Some stats:
- The minimum set humidity is currently at 70%, which seems to be a good balance between not always having everything wet while maintaining humidity. The sensor averages all humidity readings in a defined period of time (I set it for 30 min) and determines whether to turn on the mist or not for a set time (also able to adjust. I set it at 7 secs for now). When that happens, the fan is also programmed to run for a time to evaporate the mist and increase humidity.
- Fans begin by running 40% of the time (usually an hour, but can be changed in the settings), increasing as it gets more humid.
- The fogger in the video goes off about 15% of the time. Can be adjusted.
- The photoperiod is set at 14 hours, but the brightness follows a sine curve to mimic the sun.
- The dripwall turns on once a day at the start of the photoperiod for 2 minutes or so. Still have some adjustments but overall not too bad. Everything gets pretty wet (including the glass and acrylic door) and the reservoir loses a fair amount of water, so I also set the mist to go off for around 6 minutes to give everything a good flush and to refill the water, which also conveniently rinses the walls and reduces water staining.
Last edited by kcpi3141; 05-19-2022 at 03:44 AM..
|
|
Post Thanks / Like - 1 Likes
|
|
|
|
|

07-13-2022, 05:32 PM
|
 |
Member
|
|
Join Date: Mar 2021
Location: NYC, NY
Posts: 55
|
|
|
|
Post Thanks / Like - 3 Likes
|
|
|
|
|

07-17-2022, 05:21 PM
|
 |
Member
|
|
Join Date: Mar 2021
Location: NYC, NY
Posts: 55
|
|
Quick video showing the dripwall. It now goes off in the afternoon to mimic afternoon storms and improve humidity through the night. I also will be bringing an actual camera when I return, so will be posting better pictures.
https://youtu.be/HoBcCx33hEY |
|
Post Thanks / Like - 3 Likes
|
|
|
|
|

08-09-2022, 07:53 AM
|
 |
Senior Member
|
|
Join Date: Apr 2010
Zone: 9b
Location: houston
Age: 66
Posts: 4,016
|
|
 nice job!
BUT greater things than this are in your future. Orchid care and growing teach us many things that people somehow just can not.
__________________
O.C.D. "Orchid Collecting Dysfunction"
|
|
Post Thanks / Like - 1 Likes
|
|
|
|
|

08-12-2022, 01:43 AM
|
 |
Member
|
|
Join Date: Mar 2021
Location: NYC, NY
Posts: 55
|
|

Quote:
Originally Posted by RJSquirrel

 nice job!
BUT greater things than this are in your future. Orchid care and growing teach us many things that people somehow just can not. |
Thank you! Indeed it has taught me many things thus far and certainly helped me grow in other areas of life 
---------- Post added at 12:43 AM ---------- Previous post was at 12:22 AM ----------
So I finally came back from my month-long vacation! It has held up mostly wonderfully. Plants grew like mad and many flower buds appeared!
However, since I didn't have enough length of time to fine-tune the proper parameters for lighting, watering, etc., a lot of algae grew on literally everything. This included the moss, which forced me to rip out a decent amount. The aquatic portion was also horrendous and overran by diatom and cyanobacteria, so it took a while to properly clean, scrub, and water change. Regarding the lighting, I decreased it to 12hrs and reduced max intensity to 85%. Using a classic aquarium algae control method, I also turned off the lights for 3 days to kill off the algae and get a fresh start for my plants.
NYC also had ridiculous temps these past couple of weeks, and my cooler-intermediate growing plants such as the Masdevallia glomerosa were really struggling. I was already thinking of creating another smaller, low-temp terrarium using a Peltier cooler, but until that comes to fruition I placed the dying plants in a small container on top of my AC unit.
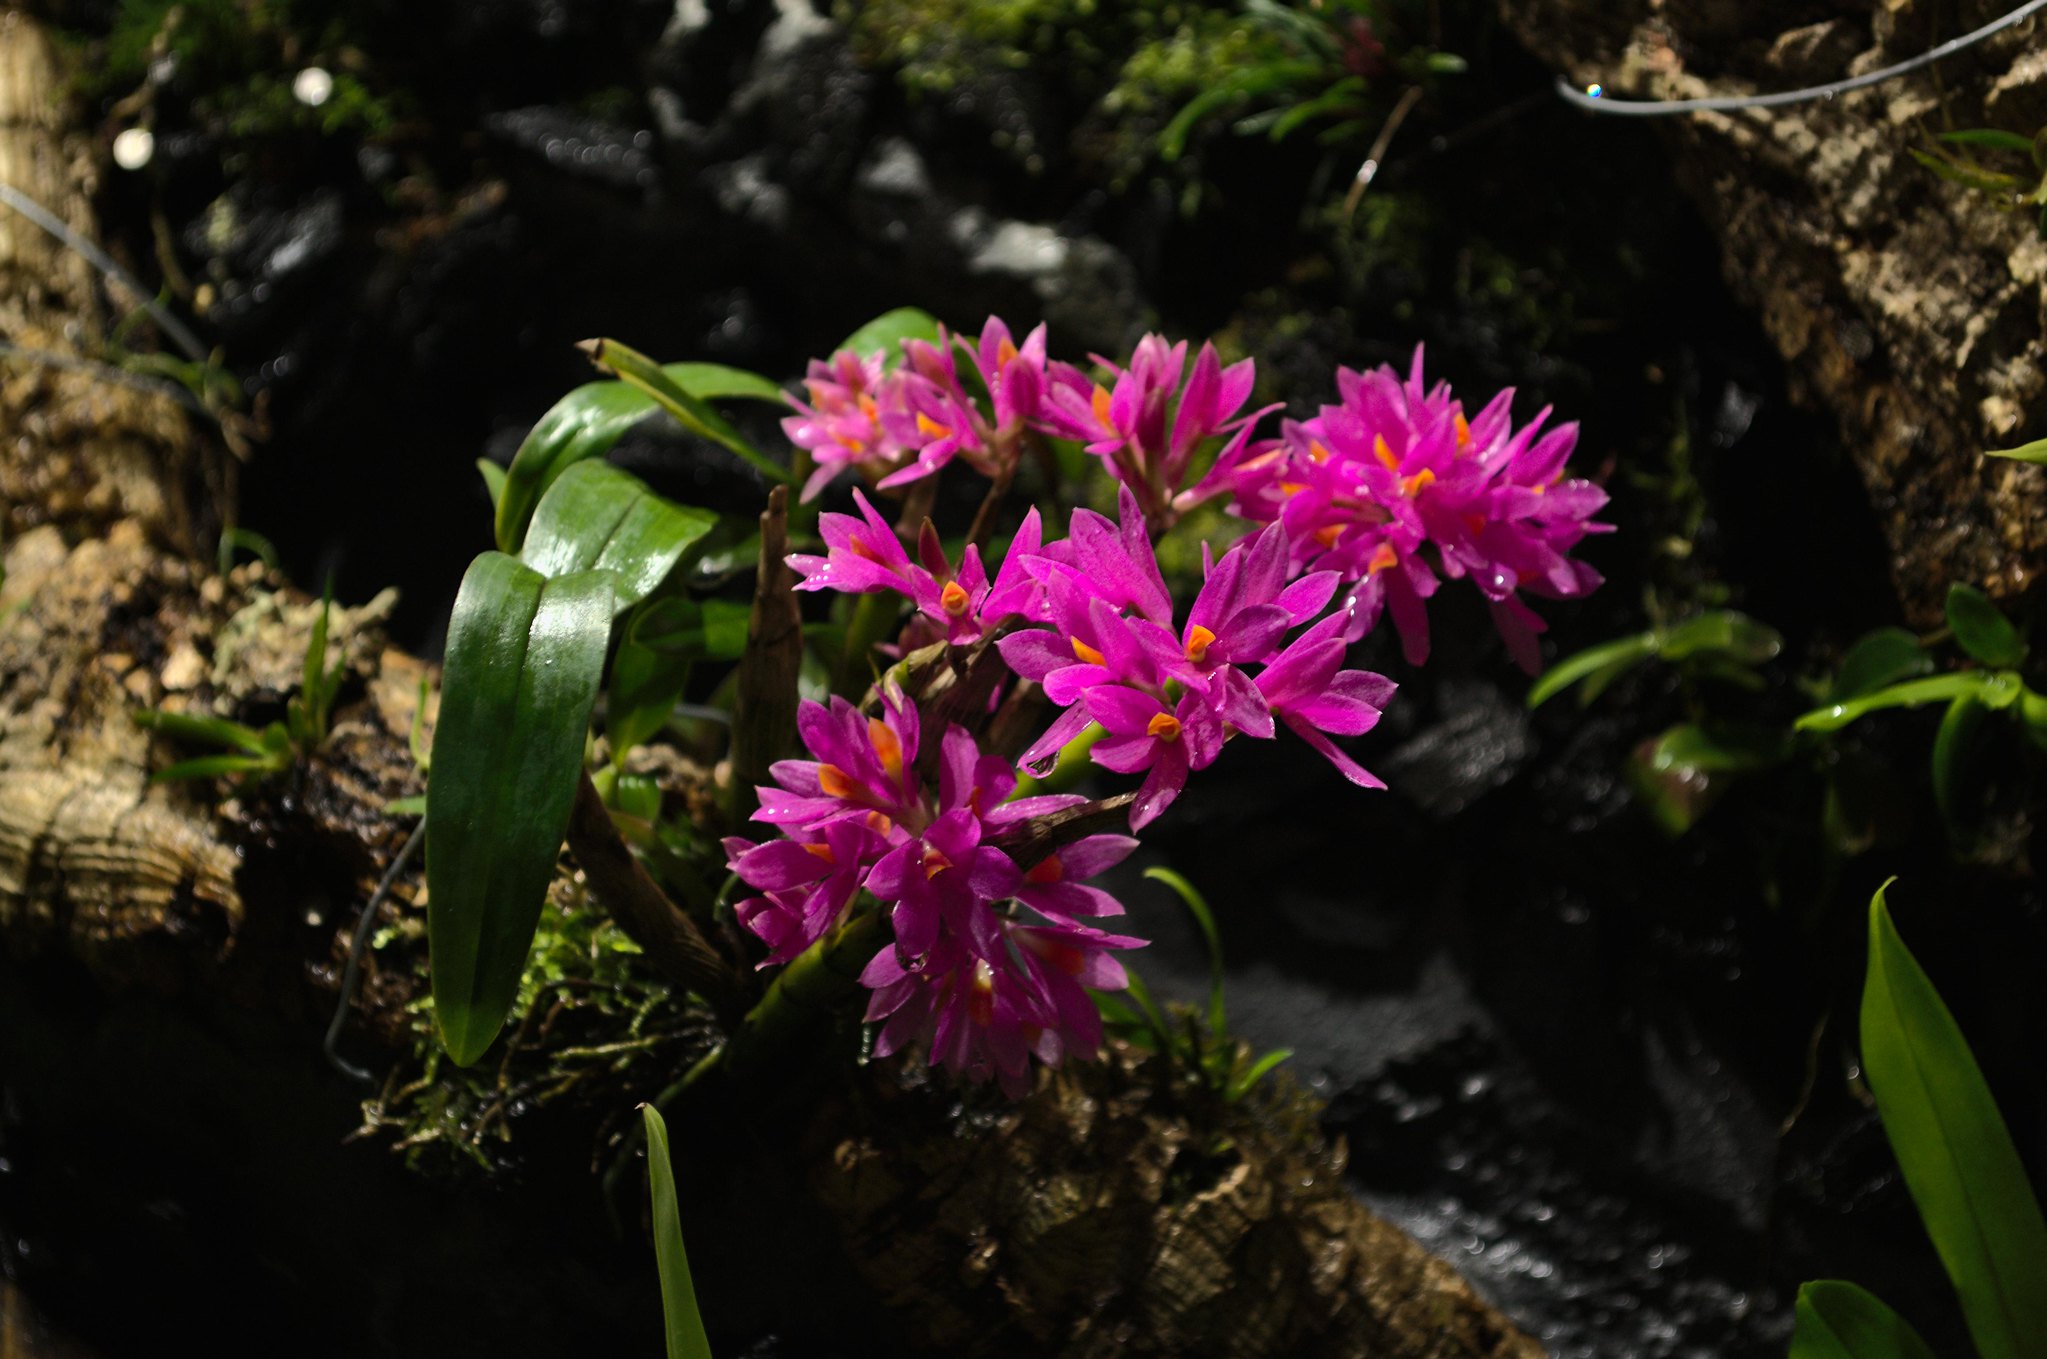
As promised, I brought my DSLR from home. Time to say goodbye to phone pics!
Dendrobium Hibiki (it looks oversaturated but the color is truly this brilliant in person):

 Dendrobium Nano Chip
:
 Psygmorchis pusilla
:
 Paphinia neudeckeri
 (VERY excited for this to flower! The placement is perfect for the pendant flowers to dangle down as planned):
 Schoenorchis fragrans:
 Unknown Nepenthes:


|

08-12-2022, 02:37 AM
|
 |
Senior Member
|
|
Join Date: Jun 2015
Zone: 9b
Location: Phoenix AZ - Lower Sonoran Desert
Posts: 18,722
|
|
Peltier coolers don't work well enough to be useful. Each exchanges only a small amount of heat.
|
|
Currently Active Users Viewing This Thread: 1 (0 members and 1 guests)
|
|
|
 Posting Rules
|
You may not post new threads
You may not post replies
You may not post attachments
You may not edit your posts
HTML code is Off
|
|
|
All times are GMT -4. The time now is 09:23 PM.
|


 [/url]


 nice job!


 Linear Mode


