

Donate Now
and become
Forum Supporter.

Many perks!
<...more...>


|

11-12-2008, 02:41 PM
|
|
Senior Member
|
|
Join Date: Nov 2006
Location: Michigan
Posts: 2,063
|
|
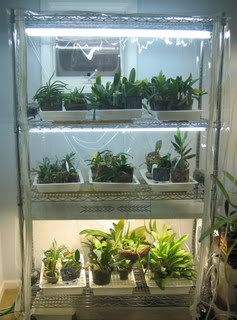
 Humidity Cart Finally Finished
 
Finally finished hanging lights today.
Top shelf - 2 T5 48"
Middle shelf - 1 T5 48"
Bottom shelf - 4 bulb T5 unit 48"
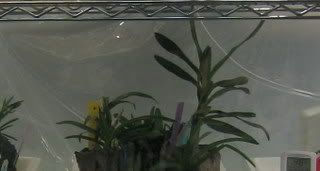
The second picture shows the hoses I use to drain everything into an under-the-bed tray.
I needed help to lift the large, heavy cover up to the top shelf (48 X 24 X 72 with zippers ).The rest of it was easy, a do it yourself job.
I followed Gwens design but changed it a bit to meet my needs. Thanks Gwen.
I'M LAZY - I didn't want to take each individual plant out to water it, wait for it to stop dripping, then put it back again.
I drilled 1/2" holes in each of the 11" X 22" trays and inserted little drain units. I attached a hose to each one and they drain into the under-the-bed tray on the floor. I use a pond pump to empty that into the larger bucket on the right side. That is the lazy man/woman way to grow orchids. Now I can water them where they are.
The larger bucket gets pumped, with a sump pump, into a sink near by. You can see the green garden hose on the floor,left side. I have a 3 1/2" fan on each shelf.
Now I need to sort out my plants according to the amount of light they need. That will take a bit of time, and a bit of thought.
Marilyn

|
|
Post Thanks / Like - 1 Likes
|
|
|
|
|

11-12-2008, 02:52 PM
|
 |
Senior Member
|
|
Join Date: Apr 2006
Zone: 9a
Location: Spring Hill, FL
Posts: 17,222
|
|
Job well done, Marilyn! 
I love what you've done  |

11-12-2008, 03:11 PM
|
|
Senior Member
|
|
Join Date: Sep 2006
Zone: 5a
Posts: 9,277
|
|
Great job! Gives me many ideas for expansion  |

11-12-2008, 03:26 PM
|
 |
Administrator
|
|
Join Date: Oct 2007
Location: middle of the Netherlands
Posts: 13,777
|
|
Super nice! I might have to copy the idea (but with only one shelf), it's a good one!  My orchids would like it very much.
__________________
Camille
Completely orchid obsessed and loving every minute of it....
My Orchid Photos
|

11-13-2008, 02:07 AM
|
 |
Senior Member
|
|
Join Date: Nov 2007
Zone: 3b
Location: Saskatoon, Saskatchewan
Age: 39
Posts: 992
|
|
Great setup!  I have to ask - where did you get that chrome shelf (and did it cost you a fortune??) I've been looking around for 48" ones that can accomodate lights, but to no avail.
Your plants will love it! Just wondering whether you plan on putting a fan in there - I know someone who gets away with opening up a little slit and letting some air exchange happen, but I wonder whether a fan would be a better idea. |

11-13-2008, 11:06 AM
|
|
Senior Member
|
|
Join Date: Nov 2006
Location: Michigan
Posts: 2,063
|
|
 Answer to your questions
Cal
Thanks for your response. I found my metal shelving at Lowes but any of the big box stores should have them. They come large, like I have, (48 X 18 X 72) and they also have a shorter one and 36" wide. I was told that if you order from the Lowes web site they are cheaper.....with free delivery. I believe the 48" one is $79.00. I learned that after I had already bought mine. The young man told me that, when he was putting the box in my car. He asked why I did not order mine from the web site.  I was a (day late and a dollar short). I bought mine at the store and had to cart it into the house myself. I'S HEAVY. I had to tear the carton apart and take it in piece by piece.....while it was still in my back seat. They are easy to assemble, the shelves are adjustable, and they are on wheels.
Yes I do have three 3 1/2" fans, one on each shelf. I found that it get quite warm in there so I leave the bottom open, a little bit, and have two of the fans blowing down and out. It helps get the temp down.

|

11-13-2008, 11:12 AM
|
|
Senior Member
|
|
Join Date: Apr 2007
Zone: 4a
Location: Bailey, Colorado
Posts: 2,408
|
|
Looks GREAT! I love your additions.
I am so happy it's working out well for you!
I LOVE LOVE LOVE mine!
I am still working on getting the lights adjusted. . .which really isn't hard but I am trying to keep the four shelves. I might have to go with three. And if so, I'll need another rack and cover. LOL
|

11-13-2008, 12:23 PM
|
|
Senior Member
|
|
Join Date: Nov 2006
Location: Michigan
Posts: 2,063
|
|

Hi Gwen
I'm thrilled with my humidity cart. I did a few thing different but basically it is like yours. I used only three shelves. I also bought the 24" deep cover instead of the 18". When I put the cart together I used the railings to extend the back from 18" to 22" My cover still fits very well. I also, am lazy.  The ..."automatic draining"  system????? works better for me.
I started out with a 48" 4 bulb T5 unit, which took from my basement cart, to put on the top shelf. It didn't take long to realize it was too much light, and too much heat. I bought 2 of the 48" single units and joined them together. I have one single unit in the center shelf. I love those single bulb units. They don't need much head room and are so easy to hang, or to change, or add to, if I desire......and they are cheap. My basement plants will appreciate getting their light back.
Gwen, you really started something when you first suggested the small unit. That didn't sound right for me but this idea of yours is great. I just added a few changes to personalize it to suit my needs.

|

11-15-2008, 08:50 PM
|
|
Senior Member
|
|
Join Date: Mar 2007
Zone: 4b
Location: Alberta Canada
Posts: 279
|
|
 Humidity Cart
Quote:
Originally Posted by Grandma M

 
Finally finished hanging lights today.
Top shelf - 2 T5 48"
Middle shelf - 1 T5 48"
Bottom shelf - 4 bulb T5 unit 48"
The second picture shows the hoses I use to drain everything into an under-the-bed tray.
I needed help to lift the large, heavy cover up to the top shelf (48 X 24 X 72 with zippers ).The rest of it was easy, a do it yourself job.
I followed Gwens design but changed it a bit to meet my needs. Thanks Gwen.
I'M LAZY - I didn't want to take each individual plant out to water it, wait for it to stop dripping, then put it back again.
I drilled 1/2" holes in each of the 11" X 22" trays and inserted little drain units. I attached a hose to each one and they drain into the under-the-bed tray on the floor. I use a pond pump to empty that into the larger bucket on the right side. That is the lazy man/woman way to grow orchids. Now I can water them where they are.
The larger bucket gets pumped, with a sump pump, into a sink near by. You can see the green garden hose on the floor,left side. I have a 3 1/2" fan on each shelf.
Now I need to sort out my plants according to the amount of light they need. That will take a bit of time, and a bit of thought.
Marilyn |
 Marilyn, this is PERFECT! I grow in my living room and I do like the design and the way you have dealt with water drainage. Where is your stand located in your house? One of the bigger issues I have is getting a stand that is sufficient size yet doesn't overwhelm the room.


|

11-15-2008, 09:12 PM
|
|
Senior Member
|
|
Join Date: Nov 2007
Zone: 9a
Location: Jacksonville, Florida
Posts: 1,532
|
|
Fantastic! You've done a great job!!!
|
|
Currently Active Users Viewing This Thread: 1 (0 members and 1 guests)
|
|
|
 Posting Rules
|
You may not post new threads
You may not post replies
You may not post attachments
You may not edit your posts
HTML code is Off
|
|
|
All times are GMT -4. The time now is 02:28 AM.
|


 I was a (day late and a dollar short). I bought mine at the store and had to cart it into the house myself. I'S HEAVY. I had to tear the carton apart and take it in piece by piece.....while it was still in my back seat. They are easy to assemble, the shelves are adjustable, and they are on wheels.
  The ..."automatic draining"
  system????? works better for me.
 Marilyn, this is PERFECT! I grow in my living room and I do like the design and the way you have dealt with water drainage. Where is your stand located in your house? One of the bigger issues I have is getting a stand that is sufficient size yet doesn't overwhelm the room.


 Linear Mode


