Actually, this is the place that I built it from last time, worked great. not as fancy and you don't have to use a solid state relay, you can just use a regular one if it has the correct switching voltage
DIY Repeat Cycle Timer
Parts List:
One solid-state relay (you choose the amperage to suit, I used 18 Amp / 120V, (US$6.50 used).
Others available like it at allelectronics.com
A DC power supply (anything from 5 to 9V DC is fine, from an old
"DiskMan").
One power-strip.
One "Bread Board" (We will build our little circuit on this, US $3 or less).
Four chips, some jumper wires of various lengths, a couple capacitors, and some
resistors.
Two wires approx 1’ (use some cord from the DC power supply mentioned above).
you won't believe they charge US$90 for these in many Grow shops!
Note that EXACT product codes are not important in selecting circuit parts. But, what IS important is for the numeric part of the code to match mine and for the number of pins to be the same. For example, if you found a 16PIN "TC4013BP" that would be fine even though the one I have says "TC4013BF". The capacitor can be any type, but if you get a polar one
like I did, make sure it goes in the proper direction. The resistors don't
matter so much, just get the res values correct. If you cant get a 130kohm resistor use a 100kohm and a 30kohm connected together, the same goes for the capacitors.
Setting up the breadboard
The Breadboard has two sides, which are electrically insulated from each other.We will call the left side GROUND and the right side POWER. We supply power and ground to the board by plugging our DC Power supply leads into bottom of the board (as shown). I recommend soldering these connections to pieces of (more rigid) jumper wire. You must match the positive wire from the power supply to the positive (right) side of the breadboard, and the negative lead to the left side. Usually, the positive wire will look different (e.g. have a white stripe like mine). The outermost holes on each side of the board are used to distribute power and ground (respectively) to an entire row of the board
The chips have either 8 or 16 pins each. The pins are numbered counter-clockwise (from bottom left of chip) as shown.
BuildingYou may connect the power and ground connections from the DC power supply anytime but DON’T PLUG IN BOARD DURING ASSEMBLY!
Note: When putting on the chips exact row positions don’t really
matter, just as long as the chips go in the order specified and are "down
the middle" of board, with lettering READABLE FROM THE GROUND SIDE.
Install all the chips
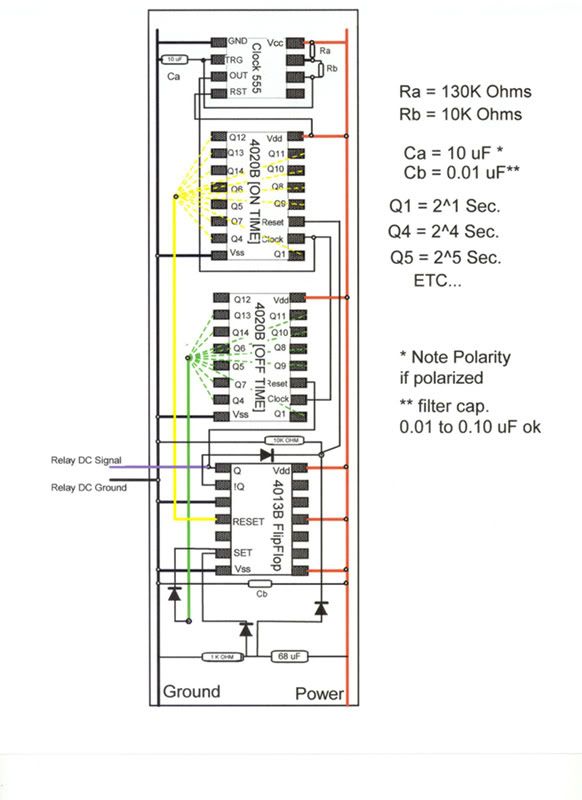
Chip#1 is the 555 timer chip.
Chip#2 = 4020B counter chip.
Chip#3 = another 4020B chip.
Chip#4 = 4013BF dual D-type Flip Flop.
Connecting the relay:
The Solid State relay has two ends, the DC control end, and the AC power end. ***Caution*** AC current can kill you, so please be careful. Make sure the power strip is UNPLUGGED.
We begin by slicing through the outer plastic of the Power Strip's insulation, about a foot or so from the plug. Peel back the insulation to reveal three wires (white, green, and black). The black one is the POWER wire, the one we will splice into the AC side of the relay. Cut the black wire and cut and peel back some insulation from each cut end. Make a small loop on each cut end, and screw down these loops under the relay's screws (AC end). [See picture for details]
Connect two small (8-12") pieces of wire [see parts list] to the Relay's DC
power and ground screws. Tape up the entire relay (especially the AC end) with black electrical tape (or duct tape). This will prevent any contact shorts and improve safety.
[/font]
To Set ON/OFF times:
Chip #3 controls OFF time.
Chip #2 controls ON time.
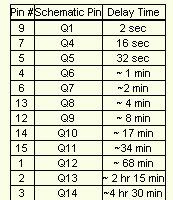
To change these times, simply plug the Yellow or Green wires into other pins (on Chips 2 and 3) as follows:
The following times are valid for chip 2 (ON time) and chip 3 (OFF time):


 Very happy!


 Linear Mode


